Friday, September 30, 2011

Some Autumn Decor


My husband was bugging me about not having enough 'Autumn/Thanksgiving' Decor last year(.... although I make up for it with Halloween decorations). So I thought I better use this as an opportunity to make some this year.

We had been given some old barn board frames from a friend who moved away, and they have been sitting in our garage unused. I decided to dig one out and make a fabric and felt sign for the mantel. I stitched the letters onto felt, cut them out and then heat n'bonded them to the fabric. Which I wrapped around and taped to some cardboard to fit into the frame (a great use of a diaper box in my opinion). Hot glued some plastic leaves I had in my stash onto the frame and tadaa, a Thanksgiving decor piece!


I also decided to make an autumn insert for this frame, remember back in this post where I made a Halloween and Christmas insert....well I thought I better do one with leaves instead of hearts for fall, here it is:


I used Close to my Hearts 'Many Thanks' Stampset, goldrush, chocolate, and creme brulee inks.

Some quick and easy autumn decor pieces, Happy Fall!

linking to:
tatertots and jello
i heart naptime
sugar and dots
madamyt
someday crafts
Come Together Kids


Tuesday, September 27, 2011

Oatmeal Chocolate Chip Cookies


I don't spend too much of my free time in the kitchen but once in awhile I do enjoy a bake day. I usually try to make my own bread and cookies and sometimes other treats!

Today I thought I would share one of my favorite recipes, Oatmeal Chocolate Chip Cookies. These are a staple in our house. I usually make a big batch and then stick em in the freezer and take out as needed and they still taste awesome!

I changed up a recipe I found in a community cookbook to make these, so here it is:

Oatmeal Chocolate Chip Cookies
Ingredients: 1 cup brown sugar
1 cup sugar
1 cup butter/margarine
2 eggs
1 tsp Vanilla
2 cups flour
1.5 cup oatmeal
1/2 tsp salt
1 tsp baking soda
1 tsp baking powder
2 cups milk chocolate chips

Cream butter and sugar until fluffy; add eggs and vanilla. Beat well. Mix flour, oatmeal, salt, baking soda and baking powder. Stir into creamed mixture ( I use my Bosch mixer to make these so I just dump in all the dry ingredients without mixing first). Add chocolate chips. Mix until blended. Drop onto ungreased cookie sheet. Bake at 350 degrees for 10 minutes.


Yield: the original recipe said 12 cookies, but with my cookie scoop I can get about 3.5 dozen. So I guess it depends how big you make them!


I usually double the recipe when I make them and I get around 8 dozen to freeze.

Tink stuck around after the party to watch me bake, haha.


Sunday, September 25, 2011

5 Strand T-shirt Headband


When I saw this tutorial on Make It and Love it for a braided headband out of an old t-shirt, I knew I had to try it. The five strand braid, I must admit, was a little intimidating but after reading through the instructions very carefully I was able to make one with no mistakes the first try (yay me!). Of course little girlie snuck in the craft room just as I had finished up sewing the braid together and she wanted to try it on (above). I have since made one a little smaller for her so it stays on better.

The long sleeved shirt I got at the thrift store specifically to cut up. $2 I think.
I loved this particular shade of yellow, perfect for fall.

My freshly cut strips ready to be braided, I went with 1.5 inch strips.

Five strand braiding actually became fun....might do a belt in the future...

The finished product.


So if you have any old t-shirts laying around this would be the perfect project. It may seem daunting but Ashley explains it really well in her tutorial, give it a try!
By the way, out of those five strips I cut I was able to make the one for me and for S. I still have a lot of shirt left to make other stuff like flowers, a scarf maybe... oh the possibilities!

linking to:
i heart naptime
sugar and dots
someday crafts

madamyt
tatertots and jello

Friday, September 23, 2011

My Kind of 'Canning'


Last weekend I decided to bite the bullet and try my hand at preserving fruit (peaches in fact). I don't have the equipment for actual canning but my mom found me a recipe for freezer preserves found HERE. It actually went quite well, below are some pics during the process:

You may recognize Sheldon and Leonard on my laptop from The Big Bang Theory,
I have all four seasons downloaded... I'm a fan.


I was able to get 7 bags out of about 3/4 of a case of peaches (I had been procrastinating thinking it would be a daunting task, so some of the case had been eaten and some had gone bad...oops). I haven't actually thawed one to see if they turned out so I'll keep you posted. I do know that the syrup is tasty!
For my first try I thought this was a pretty easy recipe to follow and the end product looks delicious! This was my kind of 'canning'!

linking to:
tatertots and jello
madamyt
i heart naptime
sugar and dots
someday crafts


Wednesday, September 21, 2011

Mushroom Centerpiece Tutorial


I wanted to share how I made this cute little mushroom for Tink to sit on at the Tinkerbell birthday party.

I had seen on google search that someone had made a mushroom cake and put Tink on top, but since I was making cupcakes I thought to make a mushroom out of something else....my ideas were to:

1. Construct one out of fabric and stuffing (to time consuming)
2. Buy a Ceramic/lawn ornament type mushroom and paint it (to expensive)
3. Make a Paper Mache Mushroom (to messy)

So instead of the above options I made it this way (which was super simple and easy!):

You will need:
- a glass
- a bowl
- two different colors of tissue paper ( I chose pink and white)
- cardstock
- circle punch
- adhesive


Find a bowl and cup that resemble a mushroom when put together.


Cover each with tissue paper as if you were wrapping a present.
Stuff the extra in the center. (no adhesive required)


Cut out circles (I used a circle punch) and adhere to the top of the mushroom.


Ta Da, you've made a whimsical mushroom for Tink to sit on...
...or any other type of creature that would sit on a toadstool.


linking to:
sugar and dots
someday crafts
tatertots and jello


Saturday, September 17, 2011

A Blog Button

I'm so happy, I finally sat down and made my own blog button! I needed a little help so I used this tutorial (thanks!). Feel free to grab the code and share Kerr-afty Creations on your blog!!

Here it is:


You may also have noticed that I added some 'pages' to the top of my blog. Not a huge deal to all those veteran bloggers, but to me I am getting so computer savvy that I'm quite impressed with myself haha. Not to mention the hubby who was totally blown away that I was using code!

I also found out this morning that my Owl Iphone Case was featured on Craptastic. Thanks Katie, you made my day!


Friday, September 16, 2011

Craving a Snack?


So my go-to snack is popcorn, I usually can't get enough of it. I have it three to four times a week, it's the best! BUT...... the other night I didn't feel like popcorn. I wanted the wonderful taste of salty-sweet (which I can get from popcorn if I put Smarties in it, but alas I had none at my disposal).

I then proceeded to raid my cupboards, the most helpful being the baking cupboard. I spotted the salted peanuts....I immediately thought mmm trailmix. Those peanuts thought they were going to make their way into cookies but I had another plan in mind. So I grabbed the milk chocolate chips(also intended for cookies) and Craisins ( I tried Raisins the next night, I think I prefer them) and Whalla! A yummy, salty, sweet (easy) snack!

It's surprising what you can come up with if you just re-purpose what you have, whether it be for crafting or eating, haha.

For those that may need my fabulous recipe:

Ingredients:
Salted peanuts
Milk Chocolate Chips
Craisins (or Raisins)
Directions: Through in a bowl, eat!


Tuesday, September 13, 2011

Owl Iphone Case


I whipped up this iphone case yesterday during naptime! Isn't it so cute?

My inspiration were these (which I found on Pinterest):


I thought these would be perfect for an Iphone case, lo and behold they actually were iphone cases that are sold Here on Etsy. I thought I could probably make one myself....and I did!


I wanted to add a little flare to the back as well, so I stitched on a heart and my initials. Now it's pretty on both sides! If I was to make another one (I was thinking about doing a halloween owl... ) I would make the back piece a smidgin smaller so that the phone would fit more snuggly.

I did take pictures of the process, so if your interested I could post a tutorial. Let me know!

p.s. again I apologize for my horrible pictures I really need to make a light box, not to mention get a better camera!

linking to:
sugar and dots
Someday Crafts
madamyt- stuff that rocks
let birds fly
fingerprints on the fridge
tatertots and jello
i heart naptime

Sunday, September 11, 2011

A 'Flitterific' Birthday Party


"All you need is faith and trust and a little bit of pixie dust"
that's right I've been planning a....
Tinkerbell Party!


I was going to hold off on this particular theme until S was a little older but she loves all the Tinkerbell movies so much right now (she even asks to watch 'bell-bell'). Even given the choice of Dora or Tinkerbell it's bell-bell 95% of the time.

I had done a family BBQ at our place on her actual birthday and we headed to the splashpark to enjoy the water and the cake that I had made (below) after the meal.


I then planned another party for some of S's friends and there mom's later on in the week ( a coffee/playdate morning party). Here are some of the details:

The Invitations


To make the invitations I just cut a standard size card into two, printed out all the wording, adhered a button to a paper flower and put a tinkerbell sticker on the front....easy peasy!

The Decorations


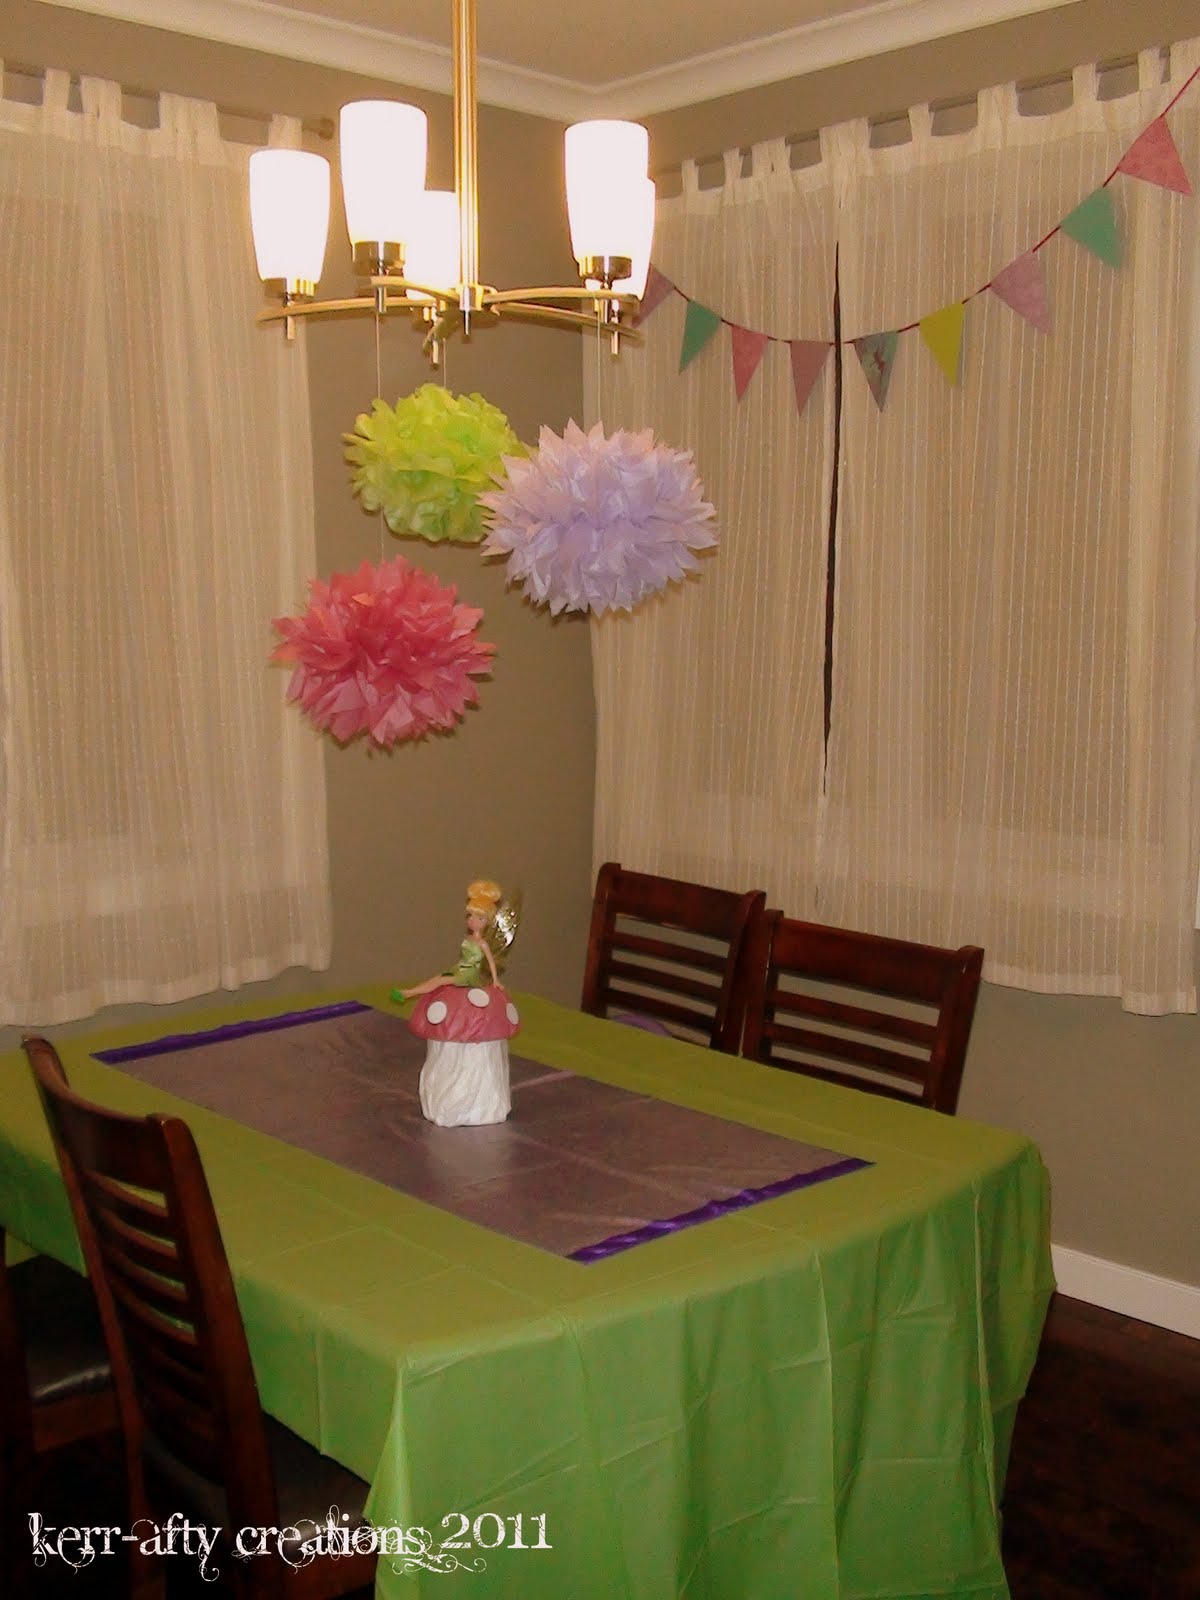
I made pennant banners from two Tinkerbell paperpacks I had in my scrapbook stash.


I found an awesome Disney Fairies wall mural at Liquidation World for $4 I decided to hang the mural on the main wall in the living room (below) and I scattered all the fairies throughout the room instead of on the mural (example above). I'm impressed with how it improved the look of the room.


I made three big tissue paper balls/flowers/pompoms for the living room (above) and three little ones for the kitchen (below). I bought my own tissue paper and used the free tutorial from HERE. It was way cheaper than buying a kit and I highly recommend it, they are a cinch to make.


I made the cute little mushroom for Tink to sit on as a centerpiece.
* Check out my tutorial HERE!


The Fun Stuff


As a treat I made Tutu's for all the kids that came. I was lucky enough to hit Dollarama at just the right time. They had just put out all their Halloween stuff so I was able to grab wings and wands for everyone too! They were so cute prancing around in their outfits. S loved having wings!


I also had a few activities on hand: Bubbles (a major hit with all the kids!), Tattoos, Stickers and Coloring sheets (which I printed out from HERE).

The Food


Since I had done a cake at the family BBQ I opted for cupcakes at the morning party. I had to use the tinkerbell stand for something anyways and they are a lot easier to serve. I made little pokes to fancy them up, most of them had little 2's and others had tinkerbell stickers. I also served strawberries and some apple danishes which were to boring to take a picture of, haha.


I didn't say easier to eat, the purple icing was only a little bit messy.


And I couldn't end this post without a pic of my littlest cutie in her party dress. Although she did spend almost the whole party sleeping, I can't complain it made things easier for me!

So that's it, the 2 year olds Tinkerbell Party!