Showing posts with label Paintings. Show all posts

Thursday, February 20, 2014

Bow holder


 The other day I had enough of digging through the bow box to find a matching pair....so I succumbed to the ever popular bow/clip holder. I decided to go from the inspiration of this card holder and used the same font from the canvas I made a couple months ago. I figured that Psalms 139:14 was a fitting scripture.


It has been a lot easier to grab a clip and the holder adds a pop of color to the girls bathroom.
Happy Thursday!


Saturday, January 11, 2014

Painted Presents

 
 My sister requested something home decorish so I decided to do up a canvas for her as part of her gift. 
I loved this FREE chalkboard printable from The Elli Blog and figured I would recreate it in gold. 
I really really liked the finish product and might just make one for myself.


I also did an inspirational canvas for our niece. 
I loved the wording and loose writing from this print.


Happy Saturday!


Saturday, October 26, 2013

Canvas: Love and Be loved


Yet another project that I did awhile ago but has not made it to the blog until now. But it was a work in progress.... Let me explain.

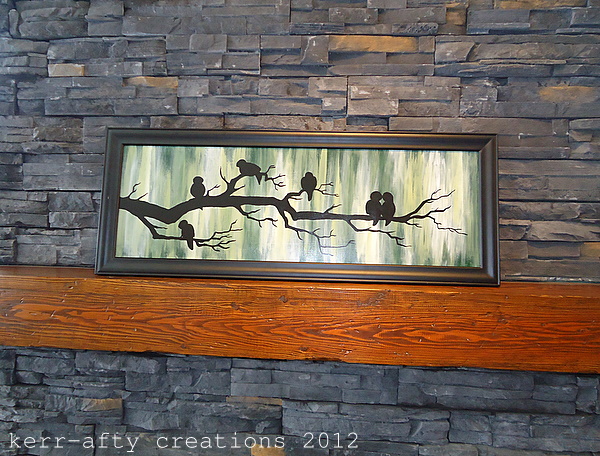
I wanted a painting for in our main floor bathroom. I picked a quote and decided on a seafoam green as my background color with a hint of light pink and white as accents (colors on the photos are off a bit).
Using my Cricut I cut out vinyl and originally had it looking like this:


Boring and not exactly what I was looking for, 
so it sat for a few weeks while I pondered what to do.

I eventually decided to paint over the vinyl doing the reverse stencil technique. But some of the paint leaked under the letters making it almost unreadable.
So I then outlined each letter with a sharpie pen which took forever awhile.
Finished it off with some whimsical white dots and I am now satisfied with the outcome.


 And yeah the pictures are crappy...still making due with my Iphone and a borrowed point and shoot (which was dropped in mud this summer). 
I have been doing some research, but any suggestions on a good camera??

Happy Saturday!


Friday, August 16, 2013

Something I need to do.


I'm a big worrier by nature (my mom passed on that wonderful trait) and I don't like it, to much stress.
When I saw this pin from Beyond Blessed Blog I knew I wanted this saying somewhere out in the open as a constant reminder.
I had bought these two canvas's at dollarama for $2 each with the intentions of painting over them.


 With the help of my cricut and some vinyl, this is what I did:


Easy Peasy!
I put it on the side table in the living room so I see it many times a day. A perfect reminder!
Happy Friday!


Tuesday, August 13, 2013

Inspired by a bag of coffee.


This post is extemely overdue! If you follow my page on facebook you may have gotten the heads up that my camera is broken.

Lack of pictures = lack of posts
So I have put together a couple of posts with my Iphone 3 photos (ugh). 
Please bare with me until I get a new camera....

This project all started with this bag of coffee that I spotted in the airport Starbucks on the way to New York. I loved the design and colors! As usual I was wanting to add more color in my home decor and thought I would recreate it on canvas.
I have given glimpses in a couple of my instapics posts. But just in case you missed it here's a good look at the process and the final product.


Happy Tuesday!


Wednesday, July 10, 2013

Beach Canvas


Well we are back from my parents place, we had a great holiday. Spending time at my parents cabin is so enjoyable, especially for the girls, they love the beach! 

My parents have been busy renovating the inside of the cabin this spring and are finally done (I think). It was my moms birthday at the end of May so I owed her a gift. Along with a scarf from NYC I did up the canvas above to go on a wall of the cabin. A suitable saying don't ya think?

To transfer the letters I tried a technique that I've never done before. I printed out a mirror image on to normal printer paper, put it face down on fresh paint, pressed so it was flat and bubble free and let dry. Once it was dry I used water to wash/rub the paper off. It took FOREVER and it DIDN'T work! I thought this would be faster than painting on the letters, boy was I wrong. I ended up rubbing off parts of each letter and it was looking pretty rough. So I decided to just rub off what I could then painted each letter overtop. It did turn out and the left over paper adds a nice texture, but it was way to much work. Anyways my mom liked it, so that was all that mattered.

After that rant I'll leave you with a sweet picture of the girlies with their creation (with some help from the adults).


Happy Wednesday!


Friday, May 31, 2013

Scrabble Decor


Confession time, hubby and I are huge nerds! 
Whenever we want a tv free night after the kids are asleep we play scrabble (I know l-a-m-e). 
What's even worse is that he usually beats me despite my greatest efforts.

So when I found an old scrabble game at a garage sale for 50 cents I knew that I wanted to make a family name display. I cut out the game board to fit into a wooden frame that I already had and adhered the tiles with my glue gun.


It has found a home in my living room and I love it. 
It definitely adds to my eclectic style.

I also made another wall hanging recently for the playroom downstairs. 
If you follow me on facebook you may have already seen the footprint art I made myself for Mothers day. Using both girls feet I made sweet butterflies on a canvas and wrote on one of my favorite quotes.


Happy Friday! 


linked up:
Sugar and Dots

Friday, January 18, 2013

Splash of Salmon


Well I've started with my new year motto of 'embrace color'... a bright salmon hanging for the wall. 
Check out the before and after below.

 I got the hanging at a garage sale for $2. I definitely had the idea to re-vamp it!
I took the rope off, painted two coats of the salmon color and used carbon paper to trace the letters on which I then painted white. A little bit of sand paper work to distress it a bit and it's a whole new sign.


I am glad I have this pop of color on the mantel and I am looking forward to hanging it in our new house. 
The only thing that bugs me now is the grammar...err, I realized after all the painting of the words that both 'everyday's should have been 'every day'. Two seperate words!!! Oh well I guess you can't win em all!
Happy Friday!


linking to:
Sugar and Dots

Tuesday, January 15, 2013

Dreamin' Pillowcases


If you remember in my insta-pics I had went to my friends wedding at the beginning of the month. Since the couple live two provinces away they had requested only money or gift cards in lieu of household items. But the crafter in me wasn't satisfied with giving just a card with a La Senza gift card and Esso gas card inside (meaning to be a 'for her' and 'for him' gift but realized they are actually interchangeable, wink wink). 

Anyways..... I had saved this idea to my computer way back when. (before I was on Pinterest actually, so I have no source.)
Pillow cases that look like one person is dreaming of the other. 
At Walmart I grabbed two plain white pillowcases and some Martha Stewart multi-surface craft paint and free hand painted the cloud and thought bubbles. After it had dried I threw them in the washer, just to make sure the paint didn't bleed or wash away. Which it didn't! I am so happy with how it turned out.


Finished it off by packaging them in a cellophane bag with a cute little hand drawn label.


And now a picture of me and the lovely bride!


Happy Tuesday!

P.S. Thanks to the hubby and lil girl for sitting laying in and being my models for the first pic. Too bad the 3 year old wasn't a better photographer than I could've been the one he was dreamin of.


linked to:
Sugar and Dots
Skip to my Lou

Thursday, November 29, 2012

Another Bird Family


 A friend of mine had seen my bird family painting hanging in our last house. She asked if I would paint one for her. I finally got it finished (not that it took to long to do it just got put on the back burner). Anyways I am so happy with how it turned out. I love the look of the long framed picture and the 6 birds instead of 4 (of course I can't change that on mine, it's a bird for each family member). I also like the look of the black silhouette instead of white and I think the green background will suit my friends house perfectly.


 She likes it and I am so happy! It was a long time coming, haha.
Happy Thursday!