Showing posts with label Tutorials. Show all posts

Thursday, March 7, 2013

Washi Tape Candle Holders

A few weeks ago I recieved an order of washi tape in the mail (so excited). I couldn't wait I had to use it some way, some how.
So I made these cute little candle holders.

To do this super easy project you will need:
Washi tape
cleaned baby food jars (with label removed)
a craft punch
scissors
wax paper


Here's a quick picture tutorial for ya,

Stick your washi tape in strips to a length of wax paper. Make sure it is long enough to wrap around the jar (My band was 3 widths of tape). In the center punch out your image. Then carefully peel off the washi tape and wrap around the jar, cutting off any excess. 
That's it, throw a candle in and light it up!

 Or... I was thinking these would be really cute gifts if you filled them with candy and decorated the lid too. 
Also using larger jars would be cute too...the options are unlimited.


I also decorated my laptop with washi tape. I just love it!


Happy Tuesday!


Tuesday, February 12, 2013

Simple Dress: A tutorial

I had been itching to get my sewing machine out lately but had no projects in mind. So I started going through my stash. When I came upon this cute owl fabric I instantly thought 'Dress'! 
S wears dresses EVERY.SINGLE.DAY.
And it happens to be a rotation of the same 4-5 dresses. 
So I thought giving her another option wouldn't be a bad idea.

I started out with a white long sleeve shirt and the fabric (measuring 18x21 inches).


I folded the fabric in half and stitched up the side to make a hoop of fabric. 
Then I hemmed along the bottom.


Along the top I hand sewed a gathering stitch leaving excess thread at both ends.


I then pulled on the thread to gather in the fabric and pinned it to the shirt. 
(Right sides together, with the skirt going up towards the top of the shirt)


I sewed the skirt onto the shirt, cut off the excess shirt and serged it.


Flip it right side out and you should have a dress.


I went a step further and sewed on sash so that the waist could be tightened.


I think she likes it, she wore it two days in a row!


Happy Tuesday!


Monday, January 7, 2013

Egg Carton Snowmen


S and I did a spur of the moment winter craft during the holidays, making snowmen out of egg cartons. It was really simple and S enjoyed it a lot. 
I cut an egg carton into segments of long segments of three. Let S color on them with markers.


Then I ran and got googlie eyes, pipe cleaners, ribbon and buttons as well as my hot glue gun. S picked out three buttons for each snowman and I put a dab of glue on for each one and she pressed them down along with the eyes. She picked out the pipe cleaners for the arms. We finished them off by wrapping a piece of ribbon around their necks for scarves.


They turned out pretty cute. S was quite happy.

I was planning on having her giveaway three of them but she insisted that they be hung from the chandelier like our halloween toilet paper roll bats were. So up they went!

The Christmas decorations have all been taken down but our four lil snowmen remain. Both girls loves to watch them twirl around. A quick simple project for a chilly afternoon.


linking to:
We Made That


We Made That

Thursday, December 6, 2012

Muffin Tin Advent Calendar


Sorry I've been MIA for the last week. Between getting ready for Christmas, a cookie swap, and baby girl having an allergic reaction I haven't had much time to post anything.  
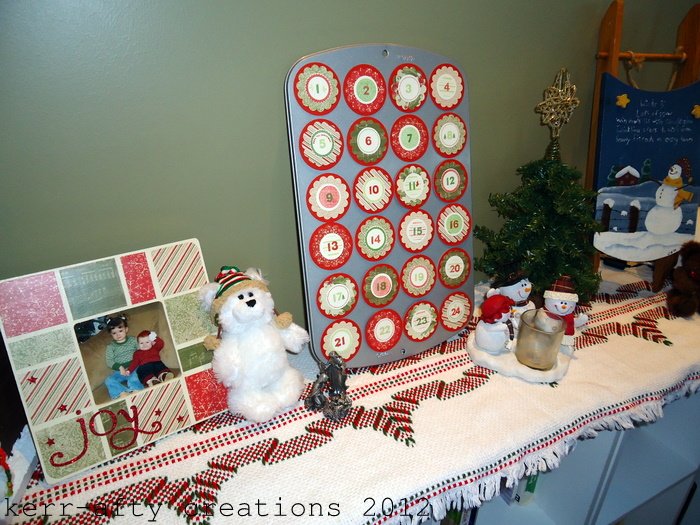
Last week I managed to get this muffin tin advent calendar done just in time for the 1st of the month. I got the idea from Queen Bee Coupons who found it in Family Fun magazine. Since a mini muffin tin has 24 spots it works perfectly. I also had enough paper left over from the Close to my Heart paper pack that I've been using in most of my Christmas projects, score!
Bonus, with how many times we move it's nice to think I'm not adding to the stuff that has to be packed (just a lil baggie of circles!).


To keep the treats in, I put tape over the opening like above and then pressed the circle on top. Like the original I hope to make them actually magnetic. Due to lack of time this is how it will be for this Christmas.

Easy enough project, here are my simple instructions:

you'll need: 
mini muffin tin 
Cardstock and/or patterned paper
tape(if your in a rush) or adhesive magnetic sheet(s)
treats that fit inside

- cut out 24 paper circles to fit over openings (mine were around 2 1/4 inches). Number 1-24 and decorate to your liking. Cut out 24 circles from the magnetic sheet(s). Adhere paper to magnetic pieces. Fill the cups with the treats, place circles over top. Easy Peasy!


See the matching joy frame to the left? So glad I had some paper left over. I also painted the sled to the right...way back in 1999 (age 13). My mom taught folk art painting classes and I got to join in on this one. Neat huh!

In other news, we put up our tree last night and my parents are coming tomorrow for a mini-Christmas since we won't be seeing them over the holidays.
It's beginning to look a lot like Christmas!
Happy Thursday!


linking to:
Sugar and Dots

Friday, September 28, 2012

Pirate Party: How To's

Here's a closer look at how I did some of the projects for the Pir-ette Party.


Pirate Props
No Sew Pirate Flag: 
You'll need: Black Felt, Red Felt, marker and Glue Gun 

- Cut out a large rectangle of black felt making one side jagged ( my flag measured approx. 3 ft x 4ft)
- Draw a number/letter with a marker onto red felt and cut out
- Hot glue number/letter onto black felt
- hang or prop up with sticks in desired location
  
No-Sew Eyepatch:
You'll need: Black felt, black thin elastic, and glue gun

- measure around a childs head with the elastic, cut a length so that it will be snug.
-  fold over the felt and cut a patch shape (giving you two identical shapes)
- Hot glue the ends of the elastic to one piece of felt, making sure the ends are touching
-  take the other piece of felt and hot glue on top of the other, hiding the elastic ends in between the two layers.


Telescope from recycled materials:
You'll need: Toilet paper rolls, Yogurt drink containers (Danino brand fits perfectly, not sure how the others would), duct tape, and spray paint.

- cut out the bottoms of the drink containers
- put container inside toilet paper roll so that it is snug, duct tape in place
- spray paint.
* the spray paint did start to scratch off of the plastic container eventually, I was just happy they held up for the party. Wasn't intending for long term use.


Pirate Costume

No-Sew Pirate Shirt:
You'll need:  a white tshirt in the child's size, scissors and red ribbon. 

- cut the sleeves jagged and cut off the collar
- cut a slit going down the middle (about 4 inches down)
- cut small holes on either side of the slit and weave a piece of ribbon through, starting at the bottom and tying together at the top.


Skirt:
You'll need: Elastic top Long sleeve shirt close to childs size and sewing machine.

- cut open the sides of the shirt at the seam as well as on the seam of the arms
- sew together the one side of the arm to the adjacent side piece. (a total of 4 lines of stitching) Look at picture below.
 * For the sash I just used a thick strip of black fabric.

Hopefully these mini-tutorials will be helpful if you end up planning your own Pirate Party! 
Check out the original post HERE.


Thursday, May 10, 2012

Easy Bracelet Tutorial


When I was at my mom and dad's over Easter, I couldn't help but bring a couple of craft supplies to do a small project. I ended up grabbing some beads and cord. Using this pin as inspiration I thought these bracelets would be a cinch to whip up.


 The braiding cord (that's what the package called it. I had wanted to use hemp but that stuff was too pricey for El Cheapo over here!) had three different colors in the package so I made a couple of brown, black, and natural. 
I think they are uber cute and could be worn with a formal or casual outfit.

Want to make your own? Here's a quick How to:


It's as simple as putting on beads and tieing a knot, I found the size that fit me best was four sections (pic four). I didn't measure the sections, just eyeballed it. At the end throw on one single bead tie another knot (pic five) and that will go through the starting loop as your clasp. Isn't that easy and quick? 
These would make great little gifts, Mothers Day is coming up!


With this tutorial and the one I shared on Tuesday you think I would have done a series like 'Jewelery week' or something. Ha.


linking to:
Sew Chatty

Tuesday, May 8, 2012

A Closer Look: Pearl and Ribbon Necklace


I have made quite a few...
... I told you guy that I found the tutorial to make one at The Crafty Blog Stalker.
But I have recieved a couple emails asking for some clarification on the instructions
... so I thought I would do an explanatory tutorial to add to the original.

Here is a closer look at the pearl and ribbon how-to:

The Beginning:


one - knot your ribbon pieces together a few inches down (I trimmed down one) and stick your needle through the knot making sure the end of your thread has a knot on it.

two - put on first bead.

three - put needle through one ribbon as shown.

four - add another bead.

five - put needle through the other ribbon as shown.

six - at this point this is what you should have.

The Tricky Part:


seven - after step six twist your top ribbon slightly as shown.

eight - add another bead.

nine - put your needle through the first thread, high enough up that it will sit on top of the last bead (this is kind of a guessing game as you go along).

ten - add another bead.

eleven - take the bottom ribbon and repeat step nine, your ribbon should always look like this before putting on another bead.

twleve - add another bead. Repeat steps nine and ten alternating ribbons as you go until you reach your desired length.


Hopefully that was helpful, if you have any questions feel free to ask!