Saturday, December 31, 2011

Until next year....

I have a couple more projects from 2011 to show you as well as 'a year in projects' post, but for lack of time left in 2011 I'll leave you with this tune.....


I just LOVE Zooey Deschanel, she cracks me up! 
(Have you seen New Girl?? it's my new fave show!)
(Check out A very She and Him Christmas album too! It rocks!)

Anyways hope you have a great New Years!!
See you in 2012!


Friday, December 30, 2011

Fabric Flower Headbands


 I had some fabric scraps left over from some recent projects so I decided to whip up some flowers and put them on headbands.

The first flower was made from scraps from the make-up bags. I just did a gathering stitch on the one long edge and pulled it together, leaving the other edge raw. Sewed a button in the center and I had a completed flower.

This one was made to fit my lil girl....although she hasn't worn it yet... I have to be really good at convincing her that a princess would wear it.


The second I made from the T-shirt scraps from the five strand headband. Using this tutorial to make the actual flower.


It turned out bigger than I had planned but I like the splash of color it gives to my outfit.

linked to:
Sugar and Dots
Blissful and Domestic


Wednesday, December 28, 2011

More Cup Cozies


Another Homemade gift, cup cozzies paired with a coffee giftcard (in this case Tim Hortons).

This is the second time I've made coffee cozies (check out my first post) and I've found they are a fun/cute little project. Of course I wouldn't have to embroider on them, but I enjoy it, so I do!

Free Gnome embroidery pattern Here.

Free Teacup embroidery pattern Here
You may recognize him from this post 

Here are the backs:

Just in case you found those quite feminine here is my male version....but I'm still not sure.... Do you think a man would use a cup cozzie?


I figured in the chinese gift exchange that the Gift Card would entice the men to go for my gift..... since the make-up bags were gender specific, this was considered my gender neutral gift...... any thoughts?

p.s. I just free handed all the writing, the large writing I wrote on with pencil first.

linked to:
Sugar and Dots


Monday, December 26, 2011

Some Make-up Bags


I hope everyone had a fabulous Christmas weekend! Over the next few days I'll be sharing some homemade gifts with you, since Christmas has now passed!

One of the gifts I made this year were make-up bags. I had  a couple chinese gift exchanges and these worked great as it was something homemade that I could fill with other goodies to reach the price limit.

This one is my favorite because of the fabric, just love the design! (sorry I couldn't track down the designer or name, if you know please leave a comment...)

I got the idea for this style of bag from Katy of Sweet Verbena ( I just love her blog she is such a creative girl! Go check it out!). Both Katy and I used the free tutorial offered Here from Skip to my Lou. Like Katy I also altered it by adding a handle.


Here is a not so fabulous pic of the other bags that I made....I did one more out of this fabric I couldn't help myself! ....Shh, I actually ended up keeping that one for myself.


linked to:
Sugar and Dots
Blissful and Domestic


Sunday, December 25, 2011

Christmas & ....Frosty


Merry Christmas!!
Remember the reason for the season! 
Thank you Lord for coming to the world as a little baby!
We are truly blessed!

Hope you have a wonderful day surrounded by your loved ones.

Just a couple of fun pictures to share with you ...
Our first ever family snowman! We built him last week! He has actually been spooking me ever since as he faces the house and stares at me, I always catch a glimpse out of the side of my eye and I always think a person is there.....
Anyways..
Little girl named him the most obvious choice....Frosty! haha


Merry Christmas from our family to yours!


Friday, December 23, 2011

Some Yummies


Eating....that's one of the main parts of Christmas right?
Well just in case you wanted to whip up a treat for tomorrow night, I thought I'd share these yummies I made to take to my mom and dad's this Christmas.

Pictured on the left is Layered Chocolate Peanut Butter Fudge . 
You can find the recipe Here.
Pictured on the right is Peanut Butter Truffles.
I altered this recipe, switching peanut butter cookies for the oreos. 
I also made the Oreo ones and topped them with coconut (sorry no pics ).


Wednesday, December 21, 2011

I Spy Ornament


I was lucky enough to get into Michaels the other day and get some clear plastic ornaments. I saw this idea on pinterest and I really wanted to make some as gifts. My inspiration came from A Diamond in the Stuff blog, although I wasn't able to find cute little figurines that fit into the top hole like she did :(. Oh well, I'm still happy with how they came out!


I used what was called vase filler (bead like pelts) from the dollar store as the 'snow' and I was able to find a little Christmas assortment pack with confetti and felt shapes to use as the hidden objects ( I also added a few other things). 

I didn't just want to write a list of items I wanted it to have a bit of a rhyme. 
This is what I came up with:

 
Set in a box and ready to give!


Hope all your Christmas crafts are coming together! I'm still finishing up on a couple myself!....and Thanks Courtney for the fab idea!


Friday, December 16, 2011

Dish Towel Apron Tutorial


 Today I thought I would show you how to make a cheap and easy last minute stocking stuffer for those little ones on your list.  An apron made out of a single dish towel! (I'll be switching back and forth between two dish towels in the tutorial)

You will need:
A dish towel  ( I got mine at Walmart for $1)
A package of coordinating Bias tape
Cutter or Scissors
Ruler
Sewing machine


1. Cut your dish cloth - You'll need 1 chest piece and  1 skirt piece.
I cut mine like so:
 - cut dish cloth in half (one half being the skirt piece)
- Chest piece measures 7 inches x 8.5 inches

2. First we'll be using the chest piece. Sew a strip of Bias tape along the longest edge. Mine measured 8.5 inches across the top.


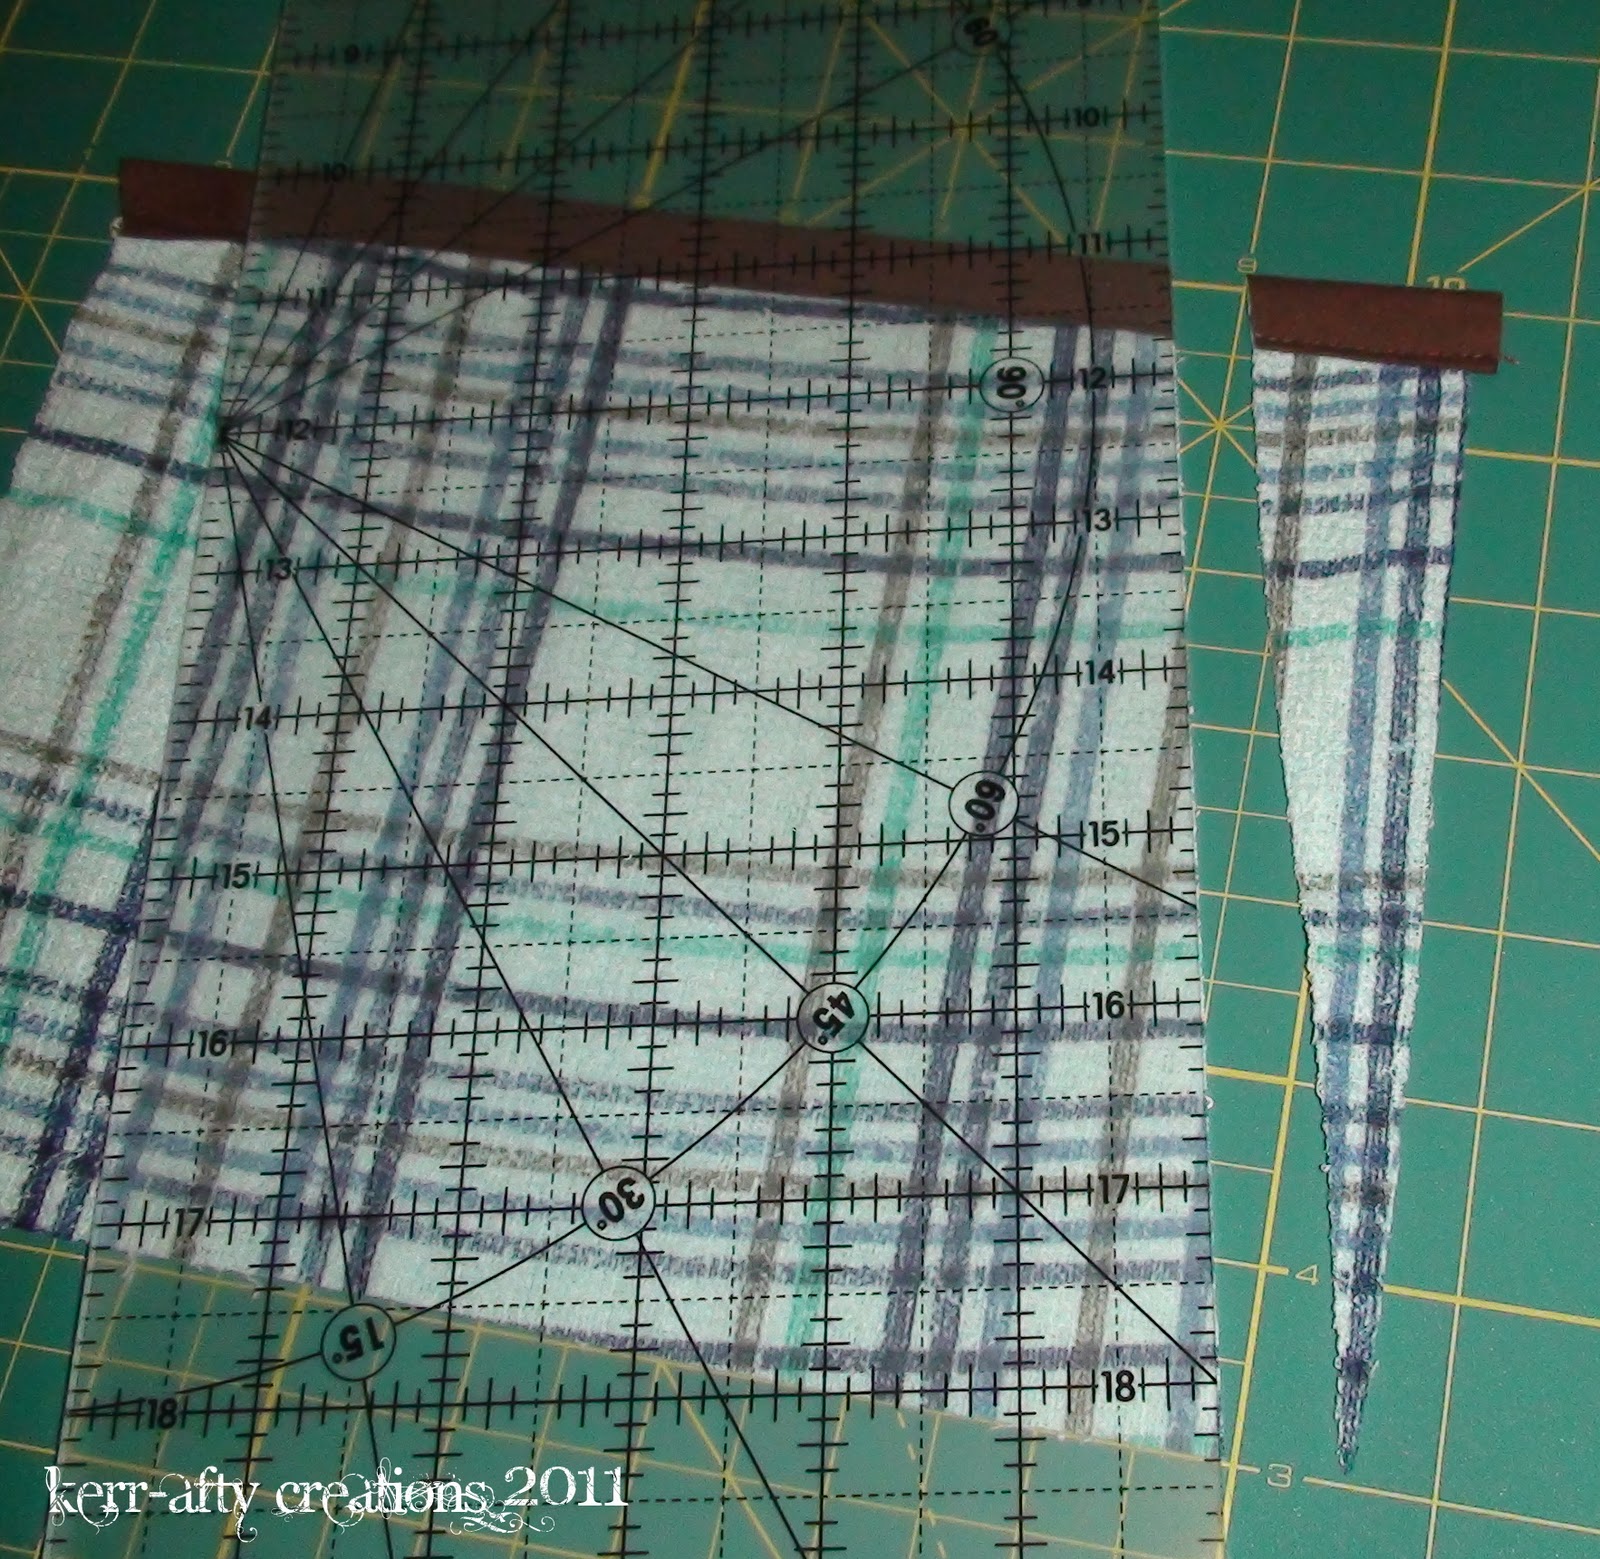
3. Measure 1.5 inches in from the side, use a ruler to cut a straight line 
from there to the bottom corner.Repeat on the other side.


4. Place Bias tape to both of the angled sides. Make sure at the top there will be enough left over to tie around the childs neck. Sew along the inside of the bias tape. Continue to sew until you've done the full length of the bias tape.

 
 Set aside chest piece and grab the main apron part. 

5. *Optional Step*  3 of the 4 sides are hemmed already 
but I didn't want the white sides to show so I hemmed them again.
This also makes the skirt part skinnier and longer. 
It's up to you for what look you're going for!


6. Center a length of Bias tape (I had a 46 inch piece) to the top of your skirt piece. 
Do not sew on ...yet


 7. Grab your chest piece and center it behind the skirt piece and pin.
Make sure it is down far enough (just below the bias tape on the back side), 
so that the stitching will go over it.


8. Sew along the top of the full length of bias tape and then again on the bottom. 
(In the picture below I had stopped sewing along the top at the edge of the skirt piece but I went back after and finished to the end of the bias tape.)


And that's it! A homemade apron for your little helper in the kitchen. 
A great stocking stuffer, don't you think?

 linking to:
fingerprints on the fridge
tatertots and jello
Blissful and Domestic


Monday, December 12, 2011

A Pearl Necklace


I saw this necklace on pinterest and thought that it would be the perfect accessory for my Christmas outfit. 
Over at The Crafty Blog Stalker she has a fabulous tutorial so you can make one for yourself. All you need is pearls, ribbon, a needle and thread. And her instructions are so easy! I already have the supplies to make more in different colors!


A very cute and inexpensive accesory!
Ribbon - $2 for the spool (can get atleast a couple necklaces from it)
Pearls- $1 for a glass pearl necklace from the dollar store (can get 2 necklaces from)
Needle and thread- $0 had on hand

Total per necklace = approx. $1.50 

The perfect stocking stuffer/gift for those wonderful women on your list!


Friday, December 9, 2011

A Little Penguin


 I whipped up this embroidery piece for the Chinese Gift Exchange that would be happening at a Church Ladies Banquet  that I attend every year. 

I don't know about you, but I am always hesitant to make something homemade for these kind of exchanges because they can be traded off if someone doesn't really like it ..... you hate to be the dud gift after all the work you put in! 

Anyways....Don't you think the lil penguin is cute? 
You can get the free embroidery pattern for him HERE.


For the lettering I free-hand stitched the small writing. 
I wrote the bigger words in pencil, then I tried my hand at the stem stitch
I thought it worked out pretty well and I like how the words stand out more!


I grabbed an empty wooden frame, added some cheery red ribbon....
...And here is the finished product:


Linking to:
Let Bird's Fly


Wednesday, December 7, 2011

Shirt = dress, headband and maybe a skirt

  
I have had this shirt in my closet for awhile....
I never wear it....
...but I couldn't part with it because I loved the detail around the collar. 
So....
  ....I decided why not try and make something for the girls out of it!

I mainly wanted to get a dress for S from it. I had also seen some cute t-shirt sleeve headbands in blogworld, so I thought I would make one of those for T if I had enough (which I definitely did). I even have enough left over to make T a skirt or I was also thinking of using the material to make ruffles to put on a onesie, which would you do?

Anyways, here is what it looks like cut up and planned out:

After some improvising, Here is the Dress!


It is really cute on, I am so happy with how it turned out!
S LOVES dresses right now! Every dress is a 'princess dress',haha.


And here is the headband:


The headband base is the strip labeled in the picture above and then I just stretched it enough so that it fit around her head without being too tight.
I made the rose from the cuffs of the shirt and the leaf from scraps. 
I then hotglued 3 gems in the center to add some bling.


So what do you think, should I do a skirt to match or a ruffled/embellished onesie??
I have been going back and forth for awhile and can't make up my mind, so help me out.

Anyways I think it's a pretty darn good use of an old shirt of mine! One shirt into two outfits for my girls with zero cost....works for me!

 *** UPDATE -- See what I did with the rest of it HERE ***

linked to:
sugar and dots
someday crafts 
let birds fly 
madamyt
The Grant Life
fingerprints on the fridge 
tatertots and jello