Wednesday, November 30, 2011
Christmas Layouts
Sorry I've been busy this last week, and although I have had time to do some projects I have not found the time to get them on the blog! Today as a quick post I thought I'd share with you my Christmas layouts from last year.
The above layout is from the Close To My Heart Magic book and I used the Mistletoe paperpack. Here is a closer look (although feel free to click on the images to enlarge them even more):
Below is a layout from Becky Higgins Sketches book (which is one of my absolute favorite layout books). The paper is leftovers from years ago and I am not sure of the company or collection.
I have some Christmas projects coming your way very soon, I promise ;)
Tuesday, November 22, 2011
No-Sew Pin Cushion Frame
Today I will be showing you how to make an easy No-sew Pin Cushion.
Supplies you will need:
- a frame (small or large...the one I used is approx. for a 2 inch by 3 inch picture)
- fabric
- polyester fluff
- scissors and gluegun
First take out the glass from the frame (in my case it was a cheap frame so I had to cut out plastic). Most frames come with a paper inside showing the size of picture to use, take this piece and cut out a piece of thin cardboard the same size and then cut your fabric slightly larger.
If you are using a circle/oval frame cut small slits along the outside of your fabric piece, with square/rectangle frames cut slits at the corners. Start to gluegun the fabric onto your cardboard piece gathering as you go, make sure not to pull tight leave the front slack.
Leave an opening at one end and stuff with the fluff.
Finish glueing around the cardboard.
Turn over and you should have a little pillow.
Hot glue around the inside of your frame
and quickly place the 'pillow' into the frame before the glue cools.
Replace the backing.
There you have it.... a quick, cute and handmade by you pin cushion!
I happened to stuff my cushion too much so my backing didn't close all the way...but nobody really looks back there, right?
Thanks Anna for having me, it was so much fun to create a tutorial for your Tutorial Tuesday!!
Saturday, November 19, 2011
Baby Girl Owls
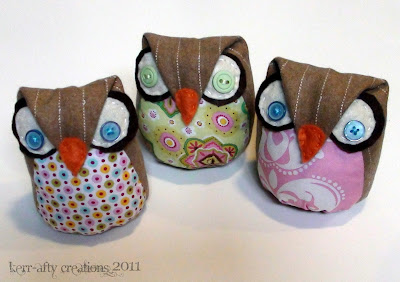
I made some more owls! I haven't made any since this time last year so this was a fun project. I was asked to make a couple for someone to give away as Christmas gifts. They are for baby girls so they have the rattle inside. I also made them bigger than the other owls, they are about 4 3/4 inches tall instead of just 3 inches.
Since I was on a roll I decided to make a couple for myself to sit on a shelf in my craft room. I love the vintage feel of both the red and blue fabrics, I picked buttons to sort of go with that theme.
I made my own pattern pieces and used different placement of the eyes but other than that I followed this tutorial.
linked to:
i heart naptime
sugar and dots
let birds fly
Friday, November 18, 2011
Have you seen it yet?
Last night I was able to go to the late night showing of Breaking Dawn! My husband treated me and a friend to a night out while he stayed home and watched the girls (which is no easy task since I'm still nursing exclusively, I came home to feed baby in between supper and the show).
I really enjoyed the movie and thought it was a good portrayal of the book (but in my opinion books are ALWAYS better). I won't say much else, don't want to spoil it for anyone. I wanted to share this music video from the soundtrack, so beautiful.
....so good....
I really enjoyed the movie and thought it was a good portrayal of the book (but in my opinion books are ALWAYS better). I won't say much else, don't want to spoil it for anyone. I wanted to share this music video from the soundtrack, so beautiful.
And just in case you aren't a diehard (excuse me, Twihard) and you haven't already seen the movie last night or tonight(technically opening night), here's the trailer:
....so good....
Thursday, November 17, 2011
Some Layouts from Retreat
A couple of weeks ago I attended a local scrapbook retreat. It was tons of fun and I was able to get 24 pages done!! I caught up on my 2011 family album and even started Thia's first year album. Here are a few of my favorite layouts that I did that weekend.
...and that's just 7 pages out of the 24, maybe I'll show you more in the future. Want a lil more info on the actual event, checkout last years retreat. Happy Scrappin'!
Tuesday, November 15, 2011
Not Here Today...
Today I am guest posting over at BeanBug Crafts! I am sharing a tutorial for Tutorial Tuesday. Go check it out Here!
Monday, November 14, 2011
Painted by Little Girl
A Creation indeed but not made by this Momma....this mini canvas was painted by S, my two year old. She is on a real painting kick right now. We have so far painted this canvas, rocks, paper, and homemade ornaments(which will be in a post shortly). And since I don't have any kid paint I let her use my acrylics. The projects actually turn out better but I do have to supervise quite intently. Anyways I thought this is a cute keepsake, so I wrote her age and date on the back. She loves to look at her 'paintin', I even had to move it to a lower shelf in her bedroom.
Just a quick one today... I've been working on a guest post as well as some Christmas projects so there is a lot more coming up in the next couple of weeks!
P.S. I bought the mini canvas at Deserres, but I have also seen them at the dollar store.
Monday, November 7, 2011
Better Late Then Never....
As promised I said that I would post our halloween costumes from last Monday. My week got away from me, so it's a little late. Hubby didn't dress-up but me and the girls were a puppy, kitty, and a mouse!
T was a little (leopard) kitty, I bought her costume at Costco. (Next year my goal is to make all the costumes....) The night before halloween I threw together some mouse ears and a tail for myself. Add a grey shirt and some facepaint and I had a nice easy costume.
I didn't make S's costume (I got it off a garage sale site), but I am sure it's homemade. She was a cute little pink puppy. I wanted to paint on a nose but she wouldn't let me. A detail I added was to put a sign on her treat pail saying 'puppy chow'.
Once again hubby and I set aside an evening to carve jack-o-lanterns (a tradition I mentioned in this post). Usually we just do one pumpkin each, hubby and I. But this year we decided to do one each for the girls too. This is what we came up with:
And I can't help myself but to share my little nephews costume. My sister made this costume for him. Isn't he the cutest little Garden Gnome??
Although we never got to see him in person the pictures she sent are priceless. (and I asked her if I could share one with all of you) She used felt for the hat, faux fur for the beard, used his normal clothes (stuffed his belly with fluff), and she made the little suspenders. SO CUTE!! He might have to model this for us at Christmas...
So that was our halloween!
Wednesday, November 2, 2011
DIY Dry Erase Board
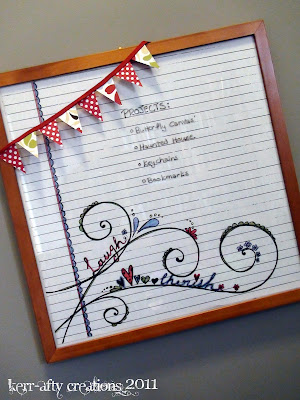
As part of the craft room re-organize project, I wanted to make a DIY erase board that people have been doing all over blog land. It's a great and simple concept. Get a frame with glass in it, put scrapbook paper in the frame, draw on the glass. Easy Peasy!
I wanted it to coincide with the colors of my craft space (I decided on blue,red, and green), so I chose a paper from my stash that you color in with pencil crayons. A super way to get the exact colors you want....and it's lined so it is perfect for this project!
I made a little pennant banner out of paper and ribbon to add some flare and a dimensional element to the outside of the frame.
Like I said, easy peasy! It was nice that I had a 12x12 frame kickin' around, that made it even easier since I didn't have to cut the main paper to fit!
linked to:
Sugar and Dots
Subscribe to:
Posts (Atom)