Tuesday, July 31, 2012

Hair Pretties


The other day during naptime it was raining so I decided to whip up a few hair pretties for the girlies. I started out by using some of the fabric rosettes from T's birthday wreath and glued them onto hair pins and clips. I also raided my ribbon stash and made some bows. I'm definitely planning on making more since I have way too much ribbon that isn't being used and they are so quick and easy to make...
 and of course they look so darn cute!


Sunday, July 29, 2012

insta-pics #20

1. We went camping last weekend in the mountains. When we arrived it was pouring rain. I took a pic of the girls watching the campsite get set up from the comfort of our truck.
2. Our Bro-in-law built a sauna on the edge of the creek. He heated up rocks (they were so hot, they were glowing red!) and placed them in the shelter and then we poured water on them for the steam. We would get so hot we'd run out and jump in the creek. The perfect ending to a day of quadding.
3. I tried out this recipe for Churro cookies....they don't live up to an actual churro, but they are ok.
4. S found a pair of T's jammies that used to be hers and she likes to wear them now, despite that they are too short/tight/small.
5. My lil daredevil.
6. As soon as the girls were down for nap, I checked the mail....I was pleasantly surprised and instantly my plans changed from cleaning house to enjoying a cup of coffee while reading on the couch (smile).


Today I'm headed to the city to go to Mary Poppins, I'm soo excited! 
Do you have any special plans? Happy Sunday!


Tuesday, July 24, 2012

love notes


Just a quick project to share with you today.... 
 I thought I need to make one! What an easy project (like my craft room dry erase board), and what a fantastic way to leave your spouse a little note to brighten their day.
I decided to make it quite simple and opted not to add any embellishments on the frame(for now anyways).
I put it right beside the coffee, which gets visited frequently throughout the day so there are plenty of chances to read or write a note.


Sunday, July 22, 2012

insta-pics #19


1. Last week we spent an afternoon down by the river by my in-laws.
2. Hubby played in a baseball tournament this past weekend. The girls and I had a great time watching and cheering.
3. Daddy's little helper.
4. Lovin my new neon pink sweater (from Old Navy).
5. Tried my first veggie burger at a local restaurant. Curry Lentil Burger, it was delicious!
6. We had a quick hail storm....both girls napped through it so I found it quite relaxing actually.
7. S has been asking for popcorn a lot lately for bedtime snack, she likes to stir in the butter.
8. The very next night she fell asleep on the couch while waiting for her popcorn, so sweet.
9. The artwork around here lately, little hands.

Hope your having a great weekend!!


Wednesday, July 18, 2012

You are my Sunshine 1st Birthday


 As you may remember we celebrated T's first birthday last month.
I did a 'You are my Sunshine' theme, which was fitting since I made these canvas' for her room. I even made some of the decorations with the idea that they could be transfered to her room after the party.

Above is a foam wreath that greeted the guests at the front door. I just wrapped the foam in fabric and bakers twine, made some fabric rosettes and pinned them on, and added a little banner and a card stock sunshine.

Here's what the inside of the house looked like at a glance (darn upper window glare,err).


 I did up the mantel with the canvas as the centerpiece. I made a huge number 1 out of cereal boxes and tissue paper (no it was not a pinata, haha). I also made several pennant banners out of some old tea towels and double fold bias tape which were placed randomly around the whole room and in the entry way.


I made a 'Happy Birthday' banner using the cricut. I used the Close to my Heart Art Philosophy cartridge for the banner and Create a Critter cartridge for the little sunshines that were around the house.

Above the kitchen table I made two tissue paper pompoms to resemble a raincloud and sun (inspiration from here). I also found some Martha Stewart sparkle garland for $2, so I cascaded that from the chandelier to the windows.

The food table was decorated with a runner made out of the leftover tea towel pieces from the pennants. I bought some pink paper straws to sip lemonade from mason jars(from here, but apparently they don't sell them anymore...). Chocolate and sprinkle covered pretzel rods were a cinch to make and are so yummy! For lunch we just had a couple of salads,veggies, and a make-your-own sandwich spot.

For the birthday cake I made a Pink Lemonade cake with a pink icing sugar glaze, which I found through pinterest. Apparently they have 'perfected' the recipe so it is not the same as what I made. I would like to try the new recipe though. With the original I ended up making 2 cakes, I screwed up on the first one, ha! Anyways...
To carry on the pennant look I decided to do a banner cake topper instead of actually decorating the cake. I also didn't want to wreck the taste of the glaze or the cake with different icing. On both this banner and the one used on the wreath I used the Stampin Up Pennant builder punch. It made my life so much easier for these projects!


Perfected or not, T really liked it!! As you can see the inside wasn't a nice pastel pink as it should have been I blame that on having red food coloring not a nice Wilton pink. But hey, it worked! Everyone seemed to enjoy it!


T also liked eating her cards! Handcrafted by some of our lil guests, so sweet.


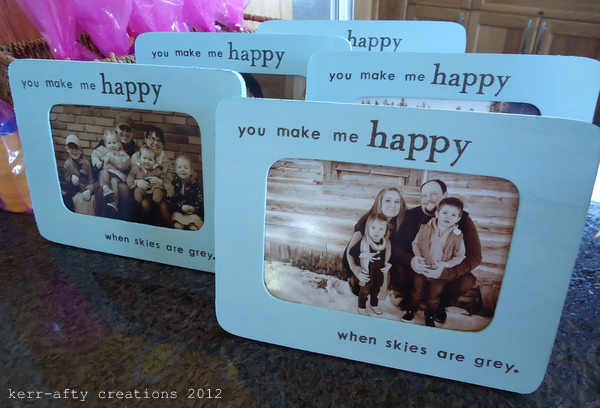
As a take home favor I bought raw wood frames, painted them blue, and stamped a line from the 'You are my Sunshine' song with Stazon. I then printed out family pics of everyone in sepia tone to go in the frames.
The kids also recieved a little goodie bag with bubbles and smarties...baby guests recieved fruit chews.


Activity wise, the kids just ran around and played either in the house or on the deck. Us adults drank coffee and had a good morning conversing. Very relaxed and enjoyable!
Of course T didn't make it to the end, she was so tired I had to put her down for her nap. What a sweetheart.

Overall the party went over really well!


Our little sunshine is ONE and she definitely makes our days brighter!
Happy first birthday sweet girl!


linked to:
Sugar and Dots

Thursday, July 12, 2012

insta-pics #18

How about insta-pics in the middle of the week? 
A little late (skipped 2 sundays) and a little early (can't wait til this sunday).

On that note, I have been MIA these last couple weeks. What was supposed to be a two night camping trip ended up being close to two weeks. Due to awesome weather and tons of fun we extended our stay. My Homemade Bread post was scheduled so I hope that sufficed while I was away. I took most of my camping pics with my regular camera but I did manage to get a couple with my phone. 

Here's the latest:


1. Our friend Travis came over for supper and brought S play-doh. He was so sweet he even played with her. He has won her over for sure!
2. I whipped up a few slow cooker freezer meals (from Here and Here) awhile back. Recently we tried out the Teriyaki Chicken. It was good but I think it needs more sauce.
3. The girls chillin in the campsite.
4. I've been rockin the sock-donut bun lately. I originally got the idea from the lovely Natasha over at Little Pink Monster.
5. T got her first haircut on one of our stops at home..... I'm a horrible hairdresser....
6. I was able to french braid S's hair, Yay! It was the perfect camping-do.
p.s. sorry for the 'hair' theme going on here...
7. T loved her noodles, while camping anything goes.
8. Me and my sweetie cuddling by the fire.
9. Baby practicing her balance/standing on the beach.


Thursday, July 5, 2012

Homemade Bread

A couple of weeks ago I guest posted over at One Dog Woof. I was lucky enough to be a part of her 'Party in my Tummy' series. Just in case you missed it,  I thought I would post it here as well!
  
I must admit, instead of being in the kitchen I would MUCH rather be playing with the girlies or craftin. I do think my kids deserve some good homemade eats though (checkout our favorite oatmeal chocolate chip cookies) and I don't mind a baking day. I'm a huge fan of quantity, if I'm going to be making a dozen cookies I might as well make 8 dozen...especially since they freeze well. So with that in mind...
I thought I would share with you the bread recipe that I use on a regular bases, this recipe yields FOUR Loaves.


This recipe is in a cookbook that my grandma made me (my aunt's recipe) and it is marked 'good recipe for beginners'. So if you've never baked your own bread, nows your chance!

Here we go!

The Ingredient Line-up:
All Purpose Flour*
Whole Wheat Flour (Optional)*
1 Tablespoon Salt
1/2 cup Sugar
2 Tablespoons Fast Rising Yeast
4 cups warm water
2 beaten eggs
1/2 cup canola oil
cooking spray, or something to grease the pans


* amount will vary for the flour. Total amount is usually around 8-11 cups. I usually do half all purpose and half whole wheat. In this post I will be using all all-purpose flour.


note: To make bread (or cookies) I use my Bosch mixer. But I'm sure any mixer would work the same(ex. Kitchenaid). You could do it by hand but it would not be as 'easy'.


Let's get started!

 -Mix 4 cups flour with the salt and sugar; add yeast.

-Make a well (which is easier if the mixer is not in the middle of the bowl), add the water, beaten eggs, and oil.

 -Mix really well and then add an additional 4 cups flour, mix again.

-Keep slowly adding flour until the dough is neither really sticky or stiff. (I usually poke with my finger if it comes out 99% clean, it's good. The stickier the dough is, the harder it is to work with. The stiffer the dough the denser the bread) 
-Form the dough into a nice bun shape and place in a large bowl; cover with dish towel; let rise (it should triple the size) approx. 15-20 minutes.

 -Once risen punch down. Cover, let rise again(20 min). punch down, cover, let rise (20 min).
-Meanwhile grease four loaf pans.

 -After letting it rise in the bowl three times,  seperate into four loaves and place them into the pans. Let rise again, this time for 45 minutes.
- Preheat oven to 350.

-Once they've risen, put them in the oven. Bake for 45 minutes, until the crusts are golden brown.
(My little helper telling me the stove is hot)

- When finished, let them cool on cooling racks, out of the pan.

-And the last step: cut yourself a slice and enjoy some of your warm homemade bread with some butter. Yum!

P.S. This bread freezes really well, I usually keep two loaves out to eat right away and throw two in the freezer!

I am no expert in the kitchen but if you have questions about any of the steps feel free to leave a comment below.

Thanks so much ChiWei for having me, I LOVE reading your blog and I am so glad I was able to contribute to your Party in my Tummy series!!