Showing posts with label Decor. Show all posts

Saturday, February 8, 2014

Many blessings


Kind of took a blog break for a few weeks there. I'm back to share another project that I made for Christmas gifts. I made six of these boards for gifts. Three of which went to chinese gift exchanges, two for specific people and I kept one for myself. On the one side I stamped on the reminder to count your blessings and the other I did a chalkboard count down. So anytime of the year it can be a nice decor piece.


The first pic of the mantel was taken right after I took down the Christmas decorations but now it's been updated for Valentines.


I'm actually thinking about selling these as I have had a few people asking. 
Just have to see if the hubby is up for cutting me some more boards.

Happy Saturday!


Thursday, November 7, 2013

Glitter and Gold


I have been helping out my friend (and hubby's cousin) renovate her bedroom. As her last name is also Kerr I decided I was going to give her one of my coveted jars as part of her birthday gift to go with her new decor.
I knew right away that I wanted to do the glitter dipped gold jar from Lilyshop.

I simply coated it twice with gold spray paint and then using painters tape marked off where the glitter line would be. With a paint brush I then applied mod podge and sprinkled on glitter. I repeated this twice ending with a top coat of mod podge.
It was such an easy project and it turned out fabulous!


Happy Thursday!


Saturday, October 26, 2013

Canvas: Love and Be loved


Yet another project that I did awhile ago but has not made it to the blog until now. But it was a work in progress.... Let me explain.

I wanted a painting for in our main floor bathroom. I picked a quote and decided on a seafoam green as my background color with a hint of light pink and white as accents (colors on the photos are off a bit).
Using my Cricut I cut out vinyl and originally had it looking like this:


Boring and not exactly what I was looking for, 
so it sat for a few weeks while I pondered what to do.

I eventually decided to paint over the vinyl doing the reverse stencil technique. But some of the paint leaked under the letters making it almost unreadable.
So I then outlined each letter with a sharpie pen which took forever awhile.
Finished it off with some whimsical white dots and I am now satisfied with the outcome.


 And yeah the pictures are crappy...still making due with my Iphone and a borrowed point and shoot (which was dropped in mud this summer). 
I have been doing some research, but any suggestions on a good camera??

Happy Saturday!


Friday, August 23, 2013

Making old new: Frame


I bought this frame at a garage sale two years ago for two bucks! It sat in waiting to be transformed. Well that day came a couple three-ish months ago. I spray painted the outside a pretty blue and the inside trim silver. I then added three lengths of wire to hang pictures from. But it has hung on the wall without anything ever since. You may have caught a glimpse of it at T's party way back in June!


Well I finally found the perfect little clothespins at Micheals and printed off some of my Instagram pictures. 
I love it and I am kicking myself for not filling it sooner.


My living room corner is now almost complete!
Other projects pictured: Scrabble Decor, Side Table, Pray More Canvas.

Happy Friday!


Friday, August 16, 2013

Something I need to do.


I'm a big worrier by nature (my mom passed on that wonderful trait) and I don't like it, to much stress.
When I saw this pin from Beyond Blessed Blog I knew I wanted this saying somewhere out in the open as a constant reminder.
I had bought these two canvas's at dollarama for $2 each with the intentions of painting over them.


 With the help of my cricut and some vinyl, this is what I did:


Easy Peasy!
I put it on the side table in the living room so I see it many times a day. A perfect reminder!
Happy Friday!


Wednesday, July 17, 2013

For a sweet lil baby


When I was at home (meaning my parents...home is where your mother is? right.), I was able to attend my friends baby shower. It was her first baby and I was so excited for her when she had her sweet baby girl. I wanted to make her something special. I had seen this project from midwestern girl and pinned it quite awhile ago waiting for the perfect opportunity to whip it up. And this was my chance! I called my friend to see what color scheme she had went with in the baby's room, I didn't want to be totally off with my colors. And she said pink and grey, perfect!

It was as simple as using a butterfly punch on an array of papers, lining them up on a background sheet, adhering each one with a gluedot and propping up the wings (if you use a shadowbox, otherwise they would be flat). I wrote out babies name in pencil and then hand stitched over top. And stuck it in the frame. 
I absolutely love how it turned out!


I also made her a Baby Moments Pail. This time I used washi tape instead of paper (inspired by a friend who had made pails up for teachers gifts, filled with goodies. Thanks Candace!). Check out my other pail here. Again I stuck with the main color scheme of grey and pink.


Happy Wednesday!


Friday, May 31, 2013

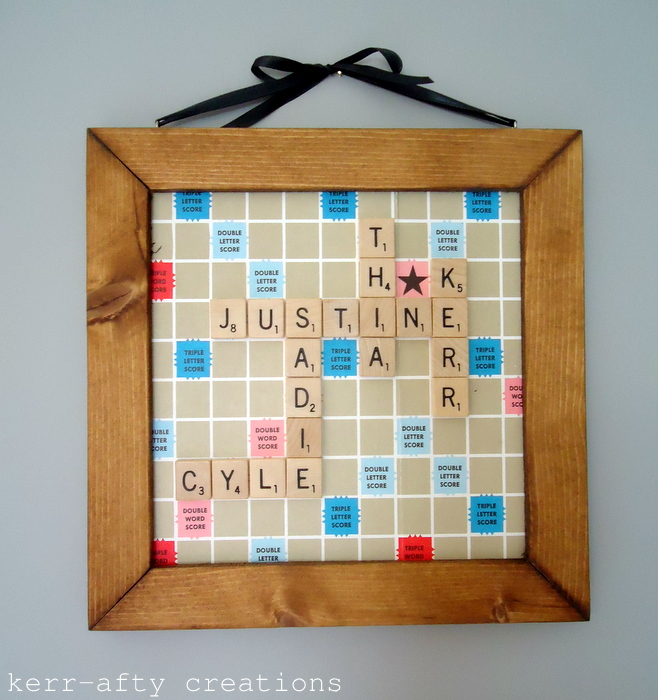
Scrabble Decor


Confession time, hubby and I are huge nerds! 
Whenever we want a tv free night after the kids are asleep we play scrabble (I know l-a-m-e). 
What's even worse is that he usually beats me despite my greatest efforts.

So when I found an old scrabble game at a garage sale for 50 cents I knew that I wanted to make a family name display. I cut out the game board to fit into a wooden frame that I already had and adhered the tiles with my glue gun.


It has found a home in my living room and I love it. 
It definitely adds to my eclectic style.

I also made another wall hanging recently for the playroom downstairs. 
If you follow me on facebook you may have already seen the footprint art I made myself for Mothers day. Using both girls feet I made sweet butterflies on a canvas and wrote on one of my favorite quotes.


Happy Friday! 


linked up:
Sugar and Dots

Tuesday, May 28, 2013

Jar of Butterflies


I am so glad summer is almost here! My house is finally feeling set-up, with only a few minor things left to do. Which means I can spend more time enjoying the beautiful weather. 

I made this butterfly jar as part of my summer decor.  It's a super simple project.

To make it you will need:

A large jar
rock(s) and stick(s)
fake butterflies
fake grass
hot glue gun
optional: Brown acrylic paint and paint brush (not pictured)
                 pencil and/or long tweezers


First off paint the lid to give it an aged look. While the paint is drying hot glue bits of 'grass' to your rock(s).


I also glued a butterfly onto one rock. Then strategically place/drop the rocks into the jar.


Haha, this is where the tweezers and pencil comes in. My opening wasn't big enough for me to drop them in properly and maneuver them at all so I used the pencil and tweezers to flip things around and place them where I wanted.

Then I glued the other butterfly onto the twig and place it in between the rocks. I just let it stand freely, I didn't hot glue the stick in.


Twist the lid on and you've got a jar of butterflies for display.


 I have had this idea in my head for a long time. I am so glad I finally finished it (not that it took long). I actually painted the lid last spring and was waiting to find the perfect fake grass for cheap (which I found at the dollar store a couple of weeks ago).

On another note, this past weekend my sis and her family were here for a quick visit which was lots of fun. And today I'm doing laundry and packing for my New York trip this weekend (SO excited!). Hope to have some scheduled posts for ya while I'm away.

Happy Tuesday!



linked up:
Sugar and Dots