Pages

Friday, July 29, 2011

I heart my Heart Punch - Part #1


Like I said in yesterdays post, I'm going to be doing a series featuring the heart punch. It all started when I made these cards (check out the full post Here):


They turned out so cute and of course I have tons of scrap paper that needs to be used up so I decided to do a few more projects. The first being this rainbow hearts wall art:


I loved the look of the rainbow on the cards so I decided to make it into some artwork for in our basement bathroom. A great way to add some cheer to the windowless room.

I found the 16x20 frame at a garage sale for $2 and because it was so big I actually needed to buy some poster board for the hearts to go onto (which was $0.86). A cute project for super cheap!


Since it is the long weekend I won't be able to post Part 2 until Monday night, as we are going to a family reunion. Hope you have good weather where you are, it looks like we are in for some more rain (surprise, surprise). Have a super weekend!


Thursday, July 28, 2011

What's to come...


This is a post of what's coming your way in the next few weeks. Above is a sneak peek of a project that is almost finished, a few details left to add. Below is a fun beginning of what will be a three part series featuring the 'heart punch'. Which after doing these cards I fell in love with! Such a great way to use up scraps that you just can't throw away!


On Friday we were sitting down for breakfast when we got a knock on the door, yippee it was the Purolator man with this package:


These were the lovelies that were inside! I have so much in mind for these fabrics you'll just have to wait and see.


Later that same day I also received this in our mailbox:

The new Close to my Heart catalog! Wahoo, my order will be in shortly and then I can start working with the great new products!

So many things coming up in the near future, stay posted!


Saturday, July 23, 2011

Frame Update with a Free Printable


This mirrored frame was simple to re-do. It used to have gold along the edges until I spray painted it black:


I then found this Free printable at Sprik Space. This image came in six different colors and this green one matched our master bedroom decor perfectly. (Unfortunately I had planned to have the pictures going length-wise so I had to cut out the bottom half of the image.)


Sprik Space has a lot of awesome free printables, check them out under 'freebies'!
Just for fun, below is another one of my favorites. It comes in 13 different colors. I love the 'Salmon' I just haven't found a spot for it yet!


Anyways back to the frame redo...
After putting the printable in the middle slot, I then added two of my favorite pictures from our honeymoon (us at long beach, Tofino on Vancouver island...gotta love camera timers!).


Here is another shot of it on the wall in our room.

I have been working on some really great projects lately, I'm getting excited to share them with you!! Happy Weekend!

linking to:
tatertots and jello
i heart naptime
sugar and dots


Monday, July 18, 2011

DIY Ruffle Lampshade


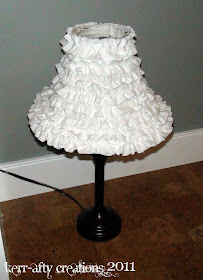
When redecorating the guest bedroom this lamp was the only one we had available for the nightstand...

The tan shade just didn't go with the rest of the room. I refused to spend money on a new one and I had seen in the magnificent Blog-world many people doing an anthropologie inspired ruffle shade. I figured what the heck, why not try it out! I had left over white fabric in my stash so I went to town making strips and then sewing a gathering stitch down the middle.

I then used my tiny hot glue gun to apply white strips along the bottom and top of the shade and then attached the ruffled strips one at a time spiraling to the top, slightly overlapping as I went.

And there you have it, a super cute new lampshade.
I would have spray painted the base but it actually fits into the room as is.
Sorry about delaying the guest room reveal, but having the baby early threw of my schedule a tiny bit. I should have it done soon, I promise!

linking to:
sugar and dots
tatertots and jello
i heart naptime


Friday, July 15, 2011

life is beauty full


This is just a quick project I whipped up last week... I had spray painted this 4x6 frame quite a while ago (it went from gold to black, sorry no 'before' pic). After I had painted it, it sat on my mantel like this:

As you can see it recently was surrounded by baby cards... and I sorta forgot about it. Until one day the empty white spot on the mantel was getting to me. The quick fix, an embroidery piece. I just freehanded a saying I liked on some fabric that was cheery:

Stitched it up while watching some meaningless sitcom and..
Voila, no more empty frame on my mantel!


Hope everyone has a fabulous weekend!

Linking to:
Tatertots and Jello
I heart Naptime
Sugar and Dots


Tuesday, July 12, 2011

Monogrammed Cushions


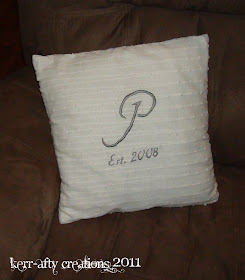
I made these two cushions for my mom and sister for their birthdays. I never did get a picture of them together because my mom ended up getting hers before I was finished my sisters. (My moms is above and my sisters below)

I love the simplicity of them. I just hand stitched the first letter of their last names and then but the year they were married. Since I have one bolster pillow left to recover (from this post) I'll be doing one for my bed in this style. I think this would also be the perfect wedding gift...too bad I won't be attending any weddings this summer.

Linking to:
Sugar and dots - What I Whipped Up Wednesday
Tatertots and Jello - Weekend Wrap-Up
I heart Naptime - Sunday Scoop


Wednesday, July 6, 2011

Rainbow Hearts Cardpack for my Sis!


It's my sisters birthday today! As part of her gift I made her this adorable card pack. When I saw this card design that Allison had done over at Little Lovelies I had to do it, so simple and so cute! I even bought a heart punch specifically to do this idea!


I chose to do a rainbow of hearts that have polkadots on them. Then with my sewing machine stitched down the center with white thread. Stamped the insides with the sentiment "Love generously, Praise Loudly, Live Fully.", added envelopes and tied it all together with ribbon. A perfect gift! (....or part of a gift in my case)


I'll be posting the other part of her gift shortly, I just finished it and I still need to take some photos!

Happy Birthday Little Sis, hope you had a fabulous day! Love you lots, I wouldn't trade being sisters with you for the world!


Linking to:
sugar and dots - what i whipped up wednesday
tatertots and jello - weekend wrap-up
i heart naptime - sunday scoop


Monday, July 4, 2011

'Big Sister' Shirt


So I did manage to get this project done before T arrived, I just never did get it posted. This is the 'Big Sister' shirt I made for S (which is actually just an altered T-shirt). I am so happy with the way it turned out!


Here's how I did it:

I started with a $2 T-shirt from Walmart.
I bought it in size 5, so it was way to big for Sadie as is.

I cut off the sleeves as well as part of the sides.

I re-hemmed the sleeves and then sewed the sides back up, giving me this long tanktop:

I cut out letters from some scrap fabric and ironed to the shirt using heat and bond.

Then I blanket stitched around the letters.

I was able to make five fabric flowers from the sleeves (even the scraps can be used for something!). I used one on the collar along with a couple of crocheted flowers I found in my stash. I also had to add a couple of buttons to the flower centers.


Here's the finished product!

Too long to be a normal shirt, too short to be a dress...add some leggings!

I might just have to make a 'little sister' shirt now...another thing to add to the list!
P.S. Happy fourth of July to all my American friends!

linking to:
Sugar and Dots - What I Whipped Up Wednesday
Tatertots and Jello - Weekend Wrap-up
I heart naptime - Sunday Scoop