Pages
▼
Tuesday, December 28, 2010
Doll Blankie
I still can't share most of my homemade gifts since we haven't gotten together with my side of the family yet! But here is a little doll quilt that I made for my daughters stocking that she recieved Christmas eve morning. We decided to open our stockings at our house early instead of hauling them out to the in-laws farm. Just made out of some scraps, it was so easy and quick to make, a great addition to the gifts she recieved this Christmas. She loves it and quite often comes up to me to wrap up her babies and then she walks around with them patting them gently, so cute!
Anyways stay posted, more of my Christmas gift creations are on the way in the next week or so!
Monday, December 27, 2010
Christmas is About Eating, right?
For Christmas Eve I was in charge of bringing a few appetizers and a dessert to my sis-in-law's. These are the dishes I brought. Three of them come from the kraft What's Cooking magazine ( I just love it, it's free and has fabulous recipes!). The recipes can also be found online at Kraft Canada, just enter the name of the dish in the search engine!
The one pictured above is called Green Chile Roll-ups. I substituted jalepenos for the chiles and sun dried tomato tortillas for the whole wheat ones, just to be a little more festive and add some more heat to the dish!
Fruit Salsa and Cinnamon Chips:
This one is not from Kraft Canada, I have made it a few times now and forget where the original recipe came from. You basically take 1 can of crushed pineapples and add other finely chopped fruit( this time I added peaches,apples, and mandarins, it changes depending on the season) and two heaping spoons of brown sugar, put in fridge. Meanwhile brush white tortillas with water and sprinkle with cinnamon and sugar, cut each circle into 8-10 triangles, place on cookie sheet and cook at 350' for about 10 minutes. Cool on cooling racks, serve with salsa!
Hot Artichoke- Parmesan Dip (from Kraft):
First time making an artichoke dip and it turned out great!
Shrimp Ring with Seafood Sauce (bought at M&M Meats):
I love shrimp rings!
Chocolate-Peppermint Striped Delight (from Kraft):
A so-easy, so-yummy dessert!! Made with candy canes, cream cheese, and chocolate pudding....Delicious!
Hope everyone had a fabulous Christmas surrounded by family and friends!! All the best in the New Year!
Monday, December 20, 2010
I'm Playing the Grinch Game!
Who doesn't love the green guy with the heart two sizes to small and his adorable one horned side kick Max? How The Grinch Stole Christmas is the epitome of a classic Christmas tale.
What better way to relive the story then a Grinchy give away! The lovely people over at A Fairy Creative Place are putting on this game with no purchase necessary and you could win $100 worth of blog candy(Merry Christmas to me if I win!!). The other great thing is that the prize package gets larger when more people join the game! You have nothing to lose head on over, get the badge!
And lets not forget about the super sweet Cindy Lou Who!!
Thanks to the wonderful Becky B. for passing on the news to me!
Hope everyone enjoys these last few hectic days before Christmas!!
Thursday, December 16, 2010
'A Sip' Card Set
This is a little card set I made featuring the Close to my Heart 'A Sip' stampset. The box was an old K&Company chipboard container that I covered with Magnifique paper and embellished with Opaques Pearls, Lagoon ribbon and buttons, and a silver embossed spoon with a couple of bitty sparkles on the handle. All product is close to my heart minus the actual box. As for the cards, they are size 4.25x4.25 and I was able to fit 6 in the box(due to 3D dots). The base is white daisy, the cardstock is Lagoon, and of course the patterned paper also came from the Magnifique paper pack. I inked all edges (minus the base) with Juniper ink and stamped the images in Pacifica ink. I liquid glassed the steam coming from the coffee cup and popped up the cup with 3D dots. I just love this stampset and I have many more ideas for it. I am a coffee addict so that explains why I like it so much!
Saturday, December 11, 2010
Christmas Mini Album Class!
This coming week I will be hosting a few ladies over at my home to make this little Christmas mini album. I got the main layout from Tracey Sanders at the Close to my Heart Bulletin Board and then tweaked it slightly. All the product is Close to my Heart, minus the embroidery floss.
The items I used are:
-6x6 Accordian Album
-Mistletoe Level 1 Paper Packet
-Mistletoe Level 2 assortment Brads
-Cranberry Brads
-Cranberry Grosgrain Ribbon
-Colonial White Cardstock
-Glitz Glitter Gel
-Cranberry Ink
-Snow Flurries Stamp set
-Opaques Pearls
-Shimmer Designer Brads
Front Cover
Pages 1&2
Pages 3&4
Pages 5&6
Back Cover
Happy Scrappin'!
Sunday, December 5, 2010
A Little Joy
Another frame I did using the same idea as my Halloween one posted in October. The wooden frame I bought at Micheals and covered with an antique white acrylic paint. I cut the paper and inked the edges and attached to the base with mod podge. I also did a top coat of mod podge over the whole frame once all the paper was on. I used the Close to my Hearts Mistletoe Paper Pack, the Glitter letters are Making Memories, and the cutie patootie pictured is my girlie on her first Christmas.
Happy festive crafting everyone!
* Update* Linked to these Linky Parties Fall 2011:
Sugar and Dots
Wednesday, December 1, 2010
Christmas Cottage
I recently bought two little house's at Liquidation World for $1 each, with plans in mind to paint and change the look completely. One I wanted to make into a haunted house for halloween (which I'll work on next fall) and the other to be a Christmas cottage. This is that house!
I'm not sure if it is completely done yet, I might add some sprinkling of white paint on the roof...still pondering that idea. Below is a 'Before' shot of the houses together. I started painting it brown before I realized I didn't have a before shot, so that is why it is accompanied by the other one. The Christmas cottage started out as a white building with a green roof.
The finished product (so far)
A closeup of the snowman I made to sit on the front. Just felt and polyester fluff for the body and nose and embroidery floss for the eyes and scarf.
I was super lucky to find some mini-mini lights in the ceramic village area in Walmart for only $3 and they are battery operated so they actually work!! It looks pretty neat on my mantel at night.
Thanks for looking! Today is December 1st so it is official decorating day for me! So I need to get busy! Have a great day yourself!
*Update #1* Check out the Halloween Haunted House
* Update #2* Linked to these parties Fall 2011:
Monday, November 29, 2010
Been awhile...
Sorry it has been awhile! I've been working on Christmas gifts lately that can't be revealed til a later date. I have also been trying to finish some Christmas decor pieces that should be posted in the near future. Until then here is a pic of some delicious scones I made recently for my ladies bible study group....yummyness!
Saturday, November 20, 2010
Wahoo, My first Blog Award!!!
I am so excited! I was just given my first Blog Award from Jackie and Michelle over at A Creative Operation. Thanks so much!!
So, when you accept the award, you must:
1. Thank and link back to the person who awarded you this
2. Share 8 things about yourself
3. Pay it forward to 8 bloggers that you have recently discovered
4. Contact those bloggers and tell them about their awards
Ok some random info about myself:
1. If I could hire out a household job it would be cooking
2. I am obsessed with making Lists
3. Two words: Coffee Addict
4. I love God
5. I loathe going shopping for jeans
6. Popcorn, the perfect snack
7. I am scared of both mice and birds
8. I am the mother of the cutest little girl on the planet!
Now for some Fabulous Blogs that you should check out!! So Inspiring!
1. Sweet About Me
2. Fabulously Artsy
3. Amy's Art from the Heart
4. Paper Babe
5. Scrappin' Becky B.
6. Wizard's Hangout
7. RT Scraps
8. Pursue Joy...
What an exciting afternoon! Thanks again for the award!!
Friday, November 19, 2010
'It's a Wide World' Layout
This is a recent layout I did, and is currently my favorite! I used the new Close to my Heart Olivia paper pack and did the Love Potion pattern from the new Magic template book! This paper was just perfect for these fall pictures of my daughter. I just love the Twitterpated Stickease as well, they are just adorable and I think they go great on this layout!
Tuesday, November 16, 2010
What a Hoot!
These little owls were so fun to make and aren't they just so darn cute?
The first one I made was the one with the gold bow, I used a glue gun to attach the eye circles and the beak and used brads for the eyes. With the rest I decided I would hand stitch on everything and use buttons for eyes, therefore making them more childproof. In the smaller ones I included a rattle inside! An adorable toy/decor piece for any baby or kid!
I plan on making a large one too in the near future! So stay posted!
Want to make your own? I got the idea off of YouTube under: stuffed owl-sewing tutorial.
Thanks for looking! Hope you have a fabulous day!
Sunday, November 14, 2010
Woodland Canvas'
Hello Everyone! Sorry for not posting the last couple of weeks, I was away visiting my sister and my brand new nephew!! The project today is a set of three canvas' that I made for his room. My sister had a woodland creature crib set so I thought these cute critters would fit right in! I also made him a couple of plush owls (to be posted soon!).
These were super easy to make. Just paint the background color, cut out random patterned paper ( I made a pattern first to trace around), ink the edges and mod podge it on! These particular canvas' were stapled on the sides so I covered the entire edge with ribbon, a different color and pattern for each canvas (not shown, sorry)! Anyways a great project and a cute addition to a little boys nursery! Thanks for looking!
P.S. Sorry for the lighting, the true colors are quite different...
Saturday, October 30, 2010
Creepy Crawlers & Spooky Treats
* Originally posted fall 2010, but for the sake of inspiring others,
posting in linky parties fall 2011
Halloween is tomorrow, yay! I have the costume sitting and waiting, the pumpkins are ready to be carved tonight, and the candy is sitting out tempting me! In halloween spirit I thought I would share a couple of appropriate projects:
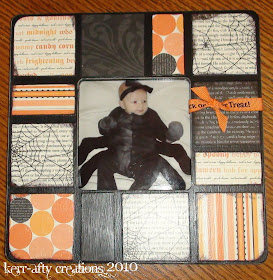
The first being a frame I altered during the recent scrapbook retreat, I have put my babies first halloween picture in it. I made the spider costume that she is wearing as well, it was super simple!
The second project is yummy devils food chocolate cupcakes decorated with black chocolate icing and purple sprinkles as well as homemade pokes!
Everyone have a safe and treat filled day tomorrow!! Watch out for the tricksters!
Happy Halloween!
* update fall 2011 linked to these parties:
sugar and dots
someday crafts
Wednesday, October 27, 2010
Love
On Thanksgiving weekend I attended a friends wedding. I made them this LOVE mini album as part of their gift. I was pretty happy with how it turned out (hope she was too!). The chipboard base album I believe was a Bobunny product, they sell them in many different words such as Baby, Family, Christmas,etc. When I saw the Love one I knew that it would make a great wedding gift! I was able to get some great pics of the couple off of facebook and their wedding website (so sneaky). I also made a matching card out of the scraps which was able to hold a gift card. I love the vintage glam feel of it!